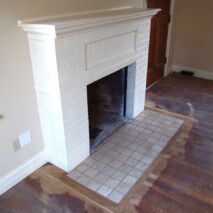
Prior to floor refinishing, repairs were needed. In this case, we removed all the damaged fireplace tile and reinstalled new with a new wood picture frame.
Candidate for new fireplace tile and wood floor border.
New dimension is determined and flooring is being cut.
New picture frame”header” has been installed with a tongue and groove joint and generous construction adhesive and yellow glue for longevity.
Picture frame “header” in and tile has been installed. Grout joints are uniform as if the tile has been there many years.
Refinishing process of the wood floor begins. Under the dirty old finish is clean new wood.
Faithful German sander.
What are these dark marks? As we sand over the floor with our sanders and using our experience, the old floor finish becomes a tell all. Meaning, When others sand floors, if they are not experienced, they can leave “divots.” As we sand off the finish, low spots from over aggressive and poor sanding remain with finish. These are low spots. Why does this matter. Poor sanding technique reduces life of floor and when the finish is applied will show an uneven surface.
Floor is sanded and now old school Glitsa swedish finish is applied.


